World Editor
The World Editor manages the environment and user controls within the scene. As the Admin of a space, you can control or restrict the user's view settings to tailor your experience.
Entry
See our full guide on setting entry position for guests.
View Modes (User Camera)
Admins can configure the default controls and camera settings for guests who enter the space.
The view modes available are:
Swivel View: A pre-defined third-person view where the user can rotate view and zoom in-and-out. Swivel View is the default for Mobile devices.

Advanced View: Third-person view with free camera rotation in all directions. Admins can set maximum settings for zoom and vertical rotation. Advanced View is the default for desktop devices.

First Person View: View from the point of view of the avatar. Moving the mouse rotates view, press "Esc" to free mouse for click interactions.
Free Camera: (Admin Only) Fly around the space in first person view. Up and Down arrows move Forward and Backward, Left and Right move according to "rotate with arrow keys" setting. Moving the mouse rotates view, press "Esc" to free mouse for click interactions.
Entry Camera Angle
Entry settings apply to the user on their first entry into the space or when portaling from one space to another. Users who leave the world will come back at the same location as when they left.
- Override View Mode: Forces users to enter this space on the chosen view mode when they are using a non-mobile device. Users can still change their view mode afterwards.
- None / Swivel / Advanced (default) / First Person
- Override View Mode (Mobile): Forces users to enter this space on the chosen view mode when they are using a mobile device. Users can still change their view mode afterwards.
- None / Swivel (default) / Advanced / First Person
-
Disable Override Message: If there is an override set, a message will inform the user that "this view mode has been set by the space creator". Disable this message by checking this setting.
-
Orientation: Direction (in defrees) of user when they enter this world. Default is 0 degrees, facing toward -Z
-
Tilt: Tilt (in degrees) of user camera when they enter this world. 0º tilt is looking straight down, 90º tilt is looking straight ahead.
-
Zoom Distance: Default zoom setting when entering the space.
View Modes
Swivel View
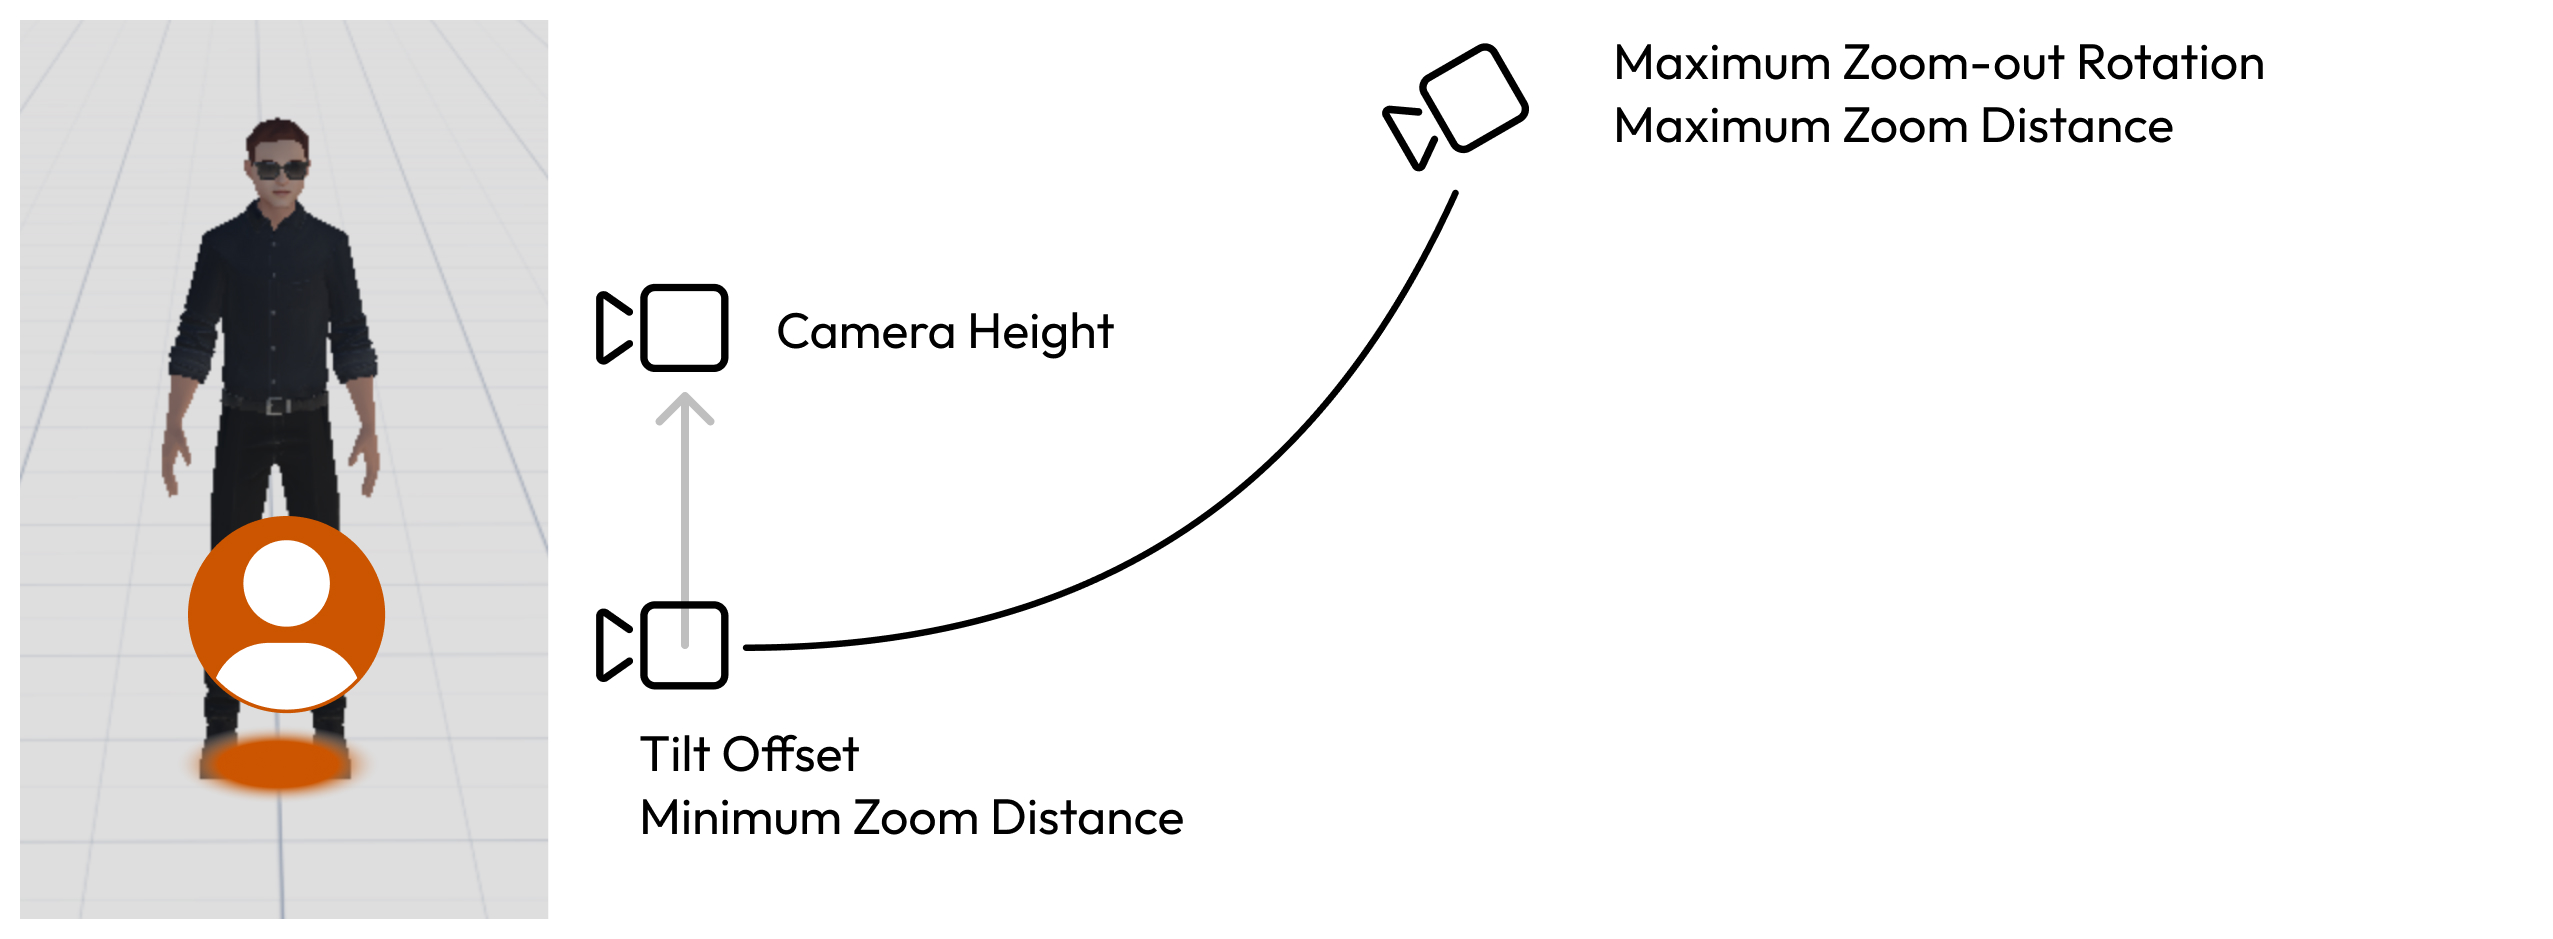
- Tilt Offset: Tilt rotation (in degrees) when the camera is zoomed in fully.
- Height Offset: Adjust the vertical position of the camera
- Height Offset (Mobile): Adjust the vertical position of the camera for Mobile Devices
- Maximum Zoom Out Rotation:
- Easing Type: Type of easing to apply to camera movement from min to max zoom distance. Set "easing" to In point, Out point, or both. Easing Type does not apply to default linear easing.
- In: Apply easing to the close zoom point
- Out: Apply easing to the far zoom point
- In and Out: Apply easing to both close and far zoom points
Easing Method:
- Linear (default) / Quadratic / Cubic
Advanced View
- Camera Height: Height of the camera pivot point in Advanced view mode.
- Camera Height (Mobile): Height of the camera pivot point in Advanced view mode on a mobile device
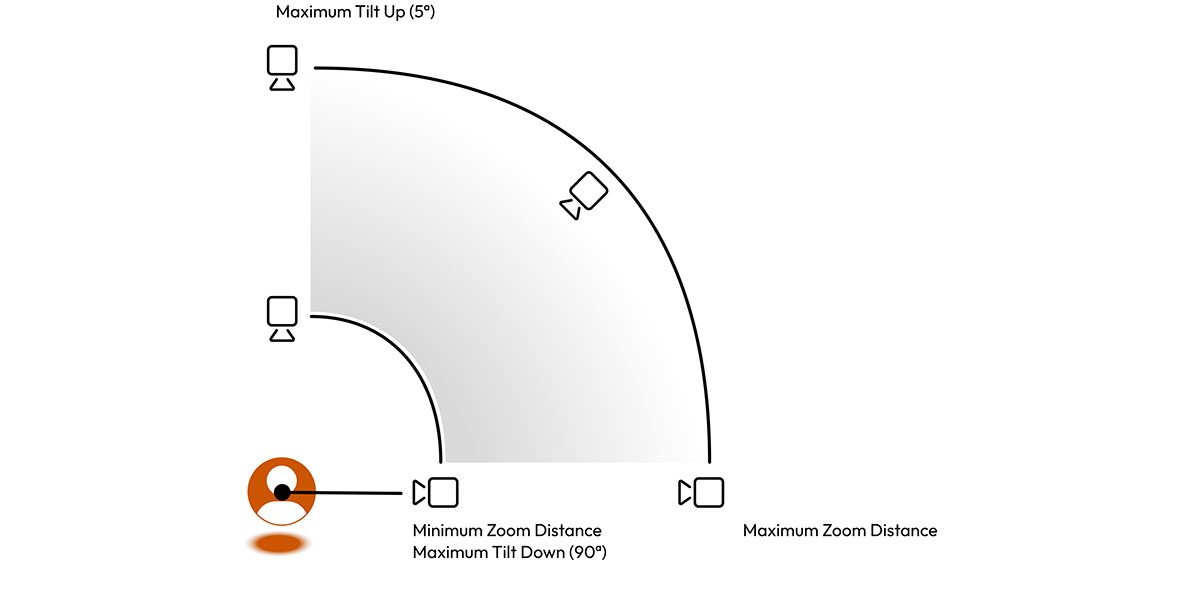
- **Maximum Tilt Up (Advanced):
- **Maximum Tilt Down (Advanced):

First Person View
- Camera Height: Height of the camera in First Person view mode.
- Camera Height (Mobile): Height of the camera in First Person view mode on a mobile device.
Camera Collision
Disable Camera Collision: Camera Collision prevents the camera from moving behind walls objects in your scene by zooming the camera in when walls or objects could interfere.
By disabling "camera collision" the camera may be blocked by objects and walls. We recommend disabling "double-sided" and using backface culling to see through the back of walls.
Controls
- Double-Tap to Move: Double-clicking on objects or the ground will move the user to that position. Disable to prevent "teleporting" and only allow local movement.
- Rotate with Arrow Keys: With this enabled, right and left arrow keys rotate the user and view angle. When disabled, right and left keys move the avatar to the right and left.
- Rotation Speed: How quickly the view rotates.
- Zoom Speed: How quickly the camera zooms when pressing the zoom controls.
- Tilt Speed: How quickly the camera tilts up and down using the advanced view controls.
- Maximum Tilt Up (Advanced): In Advanced View, the highest tilt angle the camera can reach.
- Maximum Tilt Down (Advanced): In Advanced View, how far above (in degrees) can the camera go?
- Minimum Zoom Distance: The closest distance to the avatar that the camera can zoom into.
- Maximum Zoom Distance: The furthest distance from the avatar that the camera can zoom out.
Environment
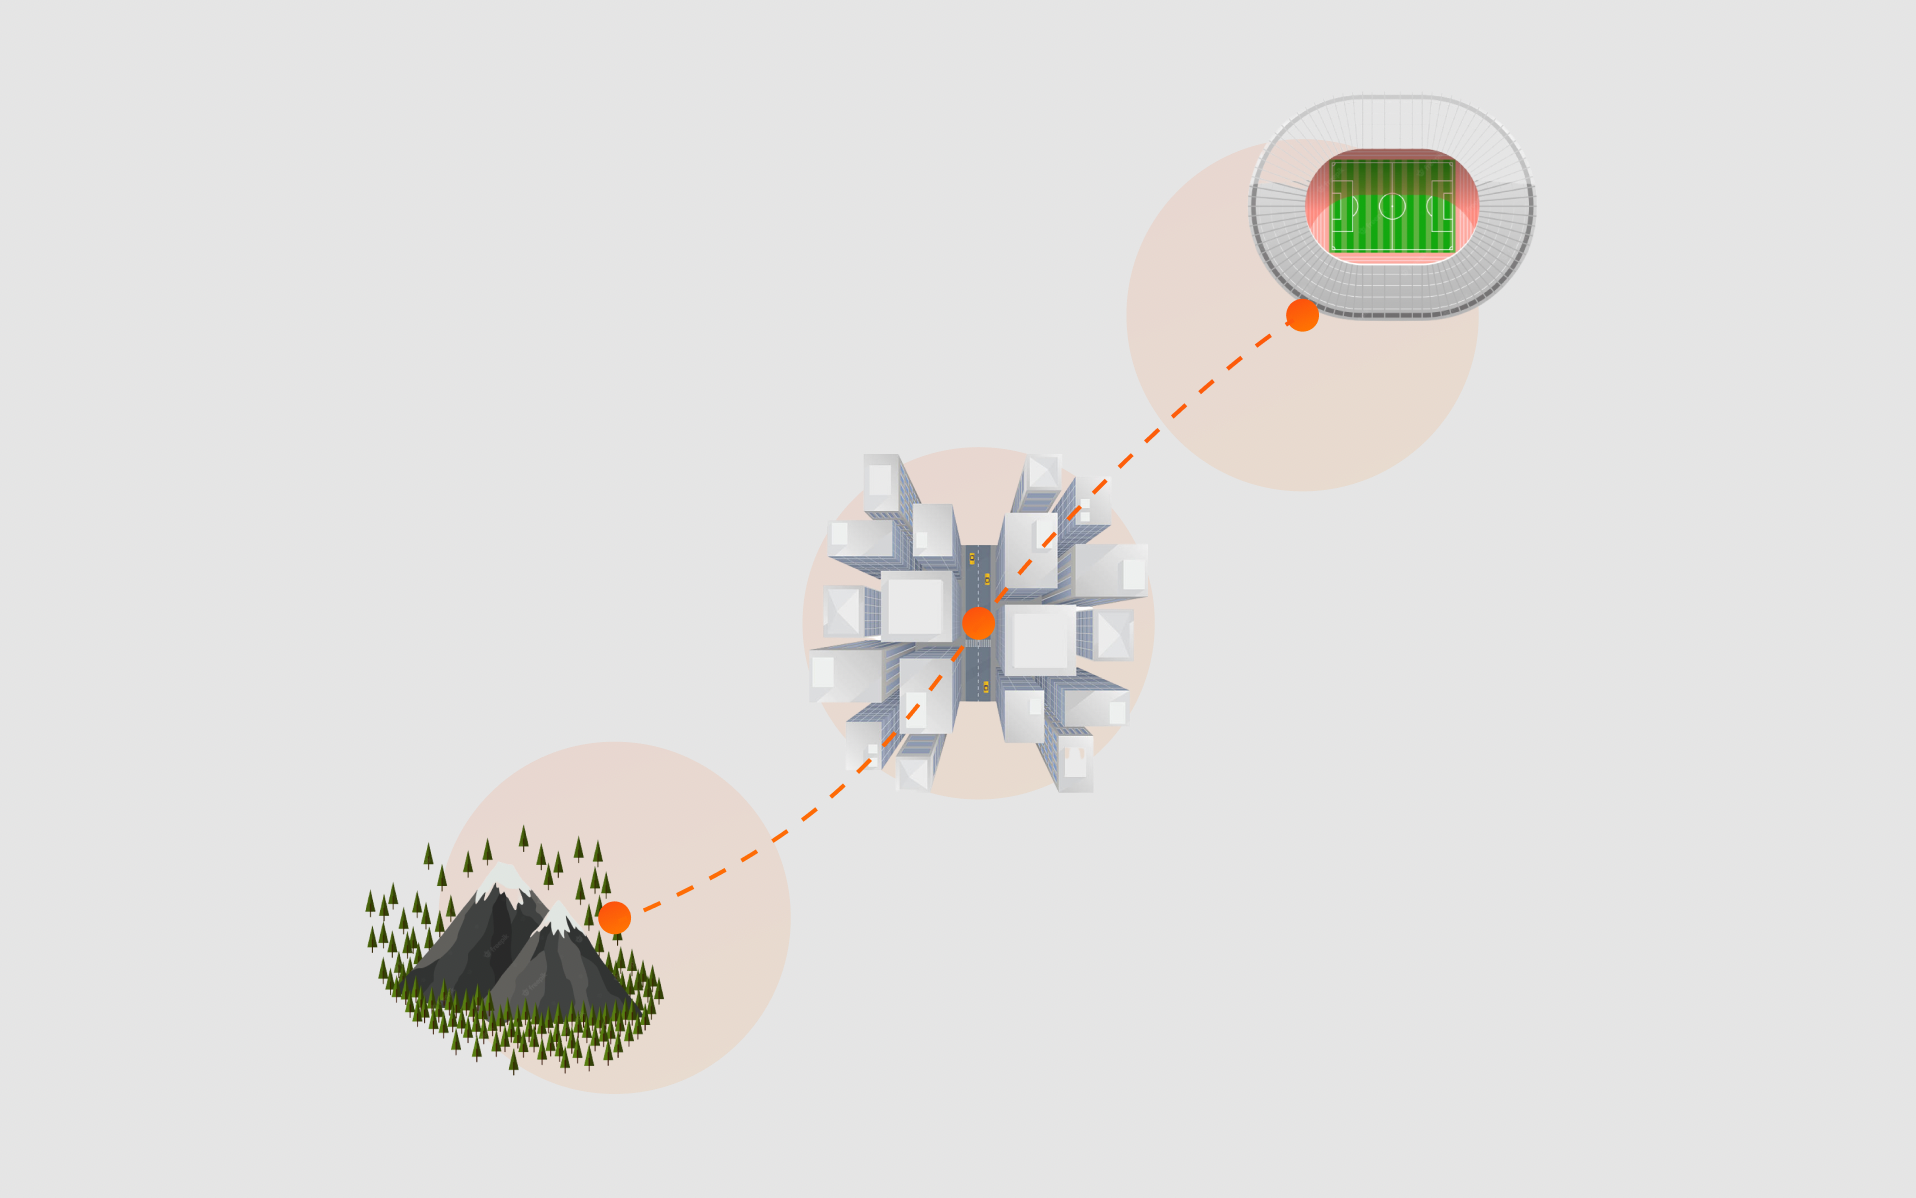
Render Distance
Set the distance that objects render for each user. Limit render distance for complex spaces with lots of objects, to prevent guests from having to load everything at once. Remember, this is a website and not a game engine. Some users may enter on a phone or mobile device with limited processing power.
As they move around and new objects come within the render radius, the new objects will be loaded and old objects will be unloaded.
The default Render Distance is 800 meters. Lower this for complex spaces with lots of objects.
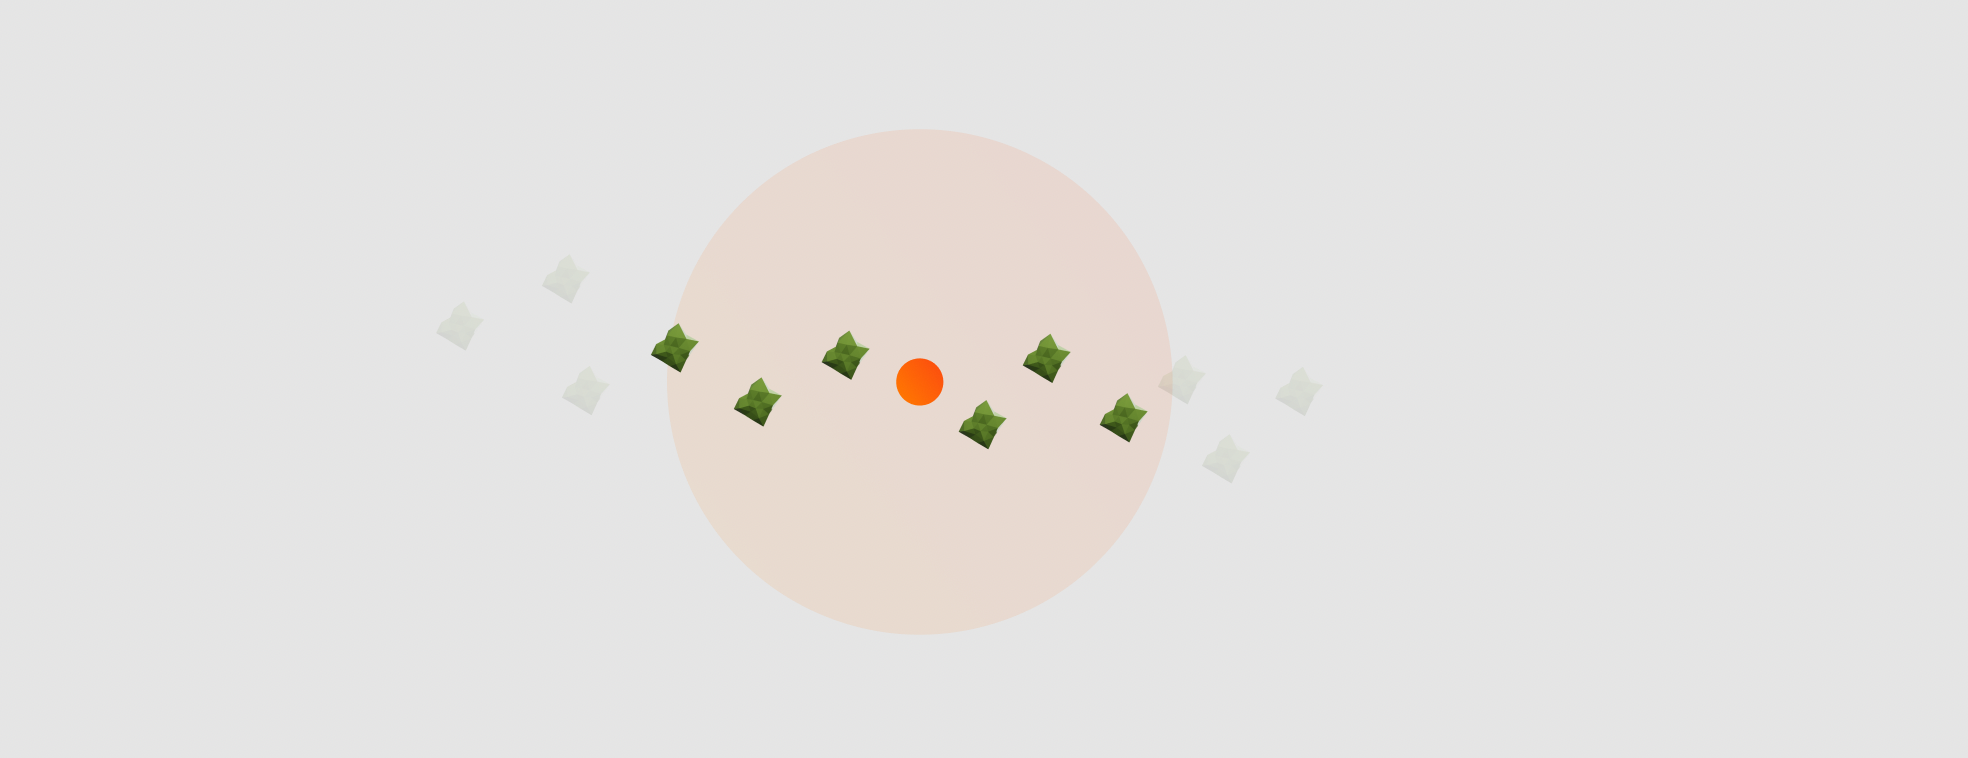
Use render distance along with Portals or the Places Menu to separate large complex areas. By the time a user has moved into the new area, the previous space has left their render zone and the new area will be loaded.
Environment Preset
We offer several presets for default environments, but most users prefer to customize their own with the Custom setting, which opens the Environment Settings below.
Environment Settings
Environment Settings are found in the Editor > World > Environment. There are several controls that affect the overall lighting and brightness of your scene and objects.
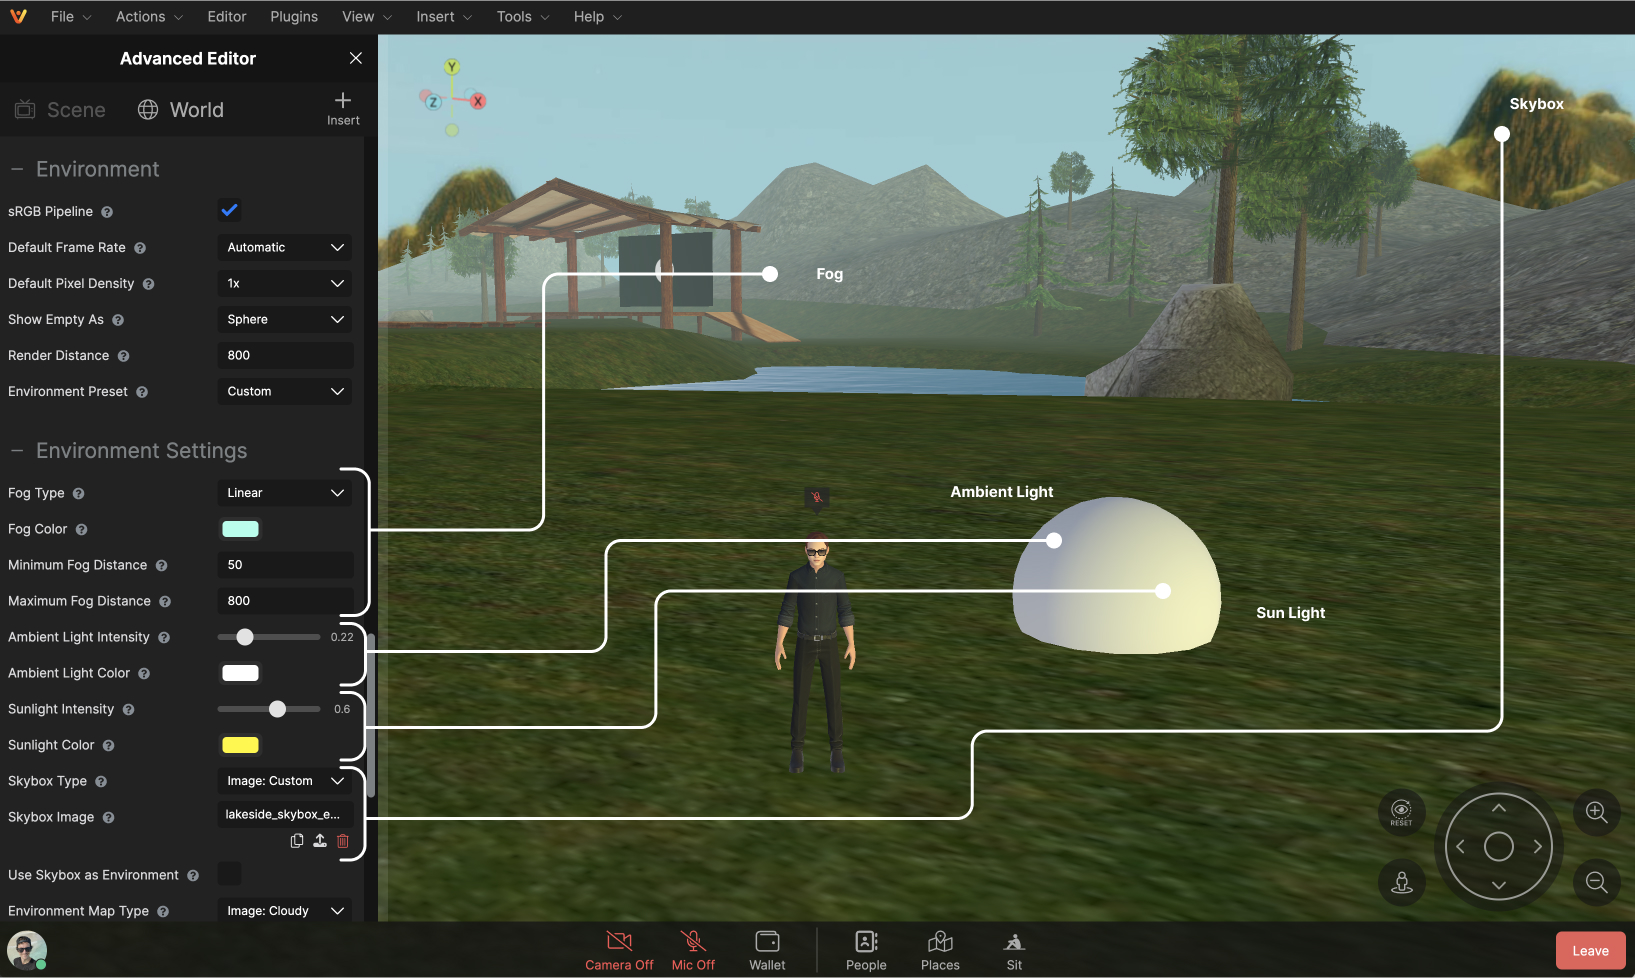
Fog Distance
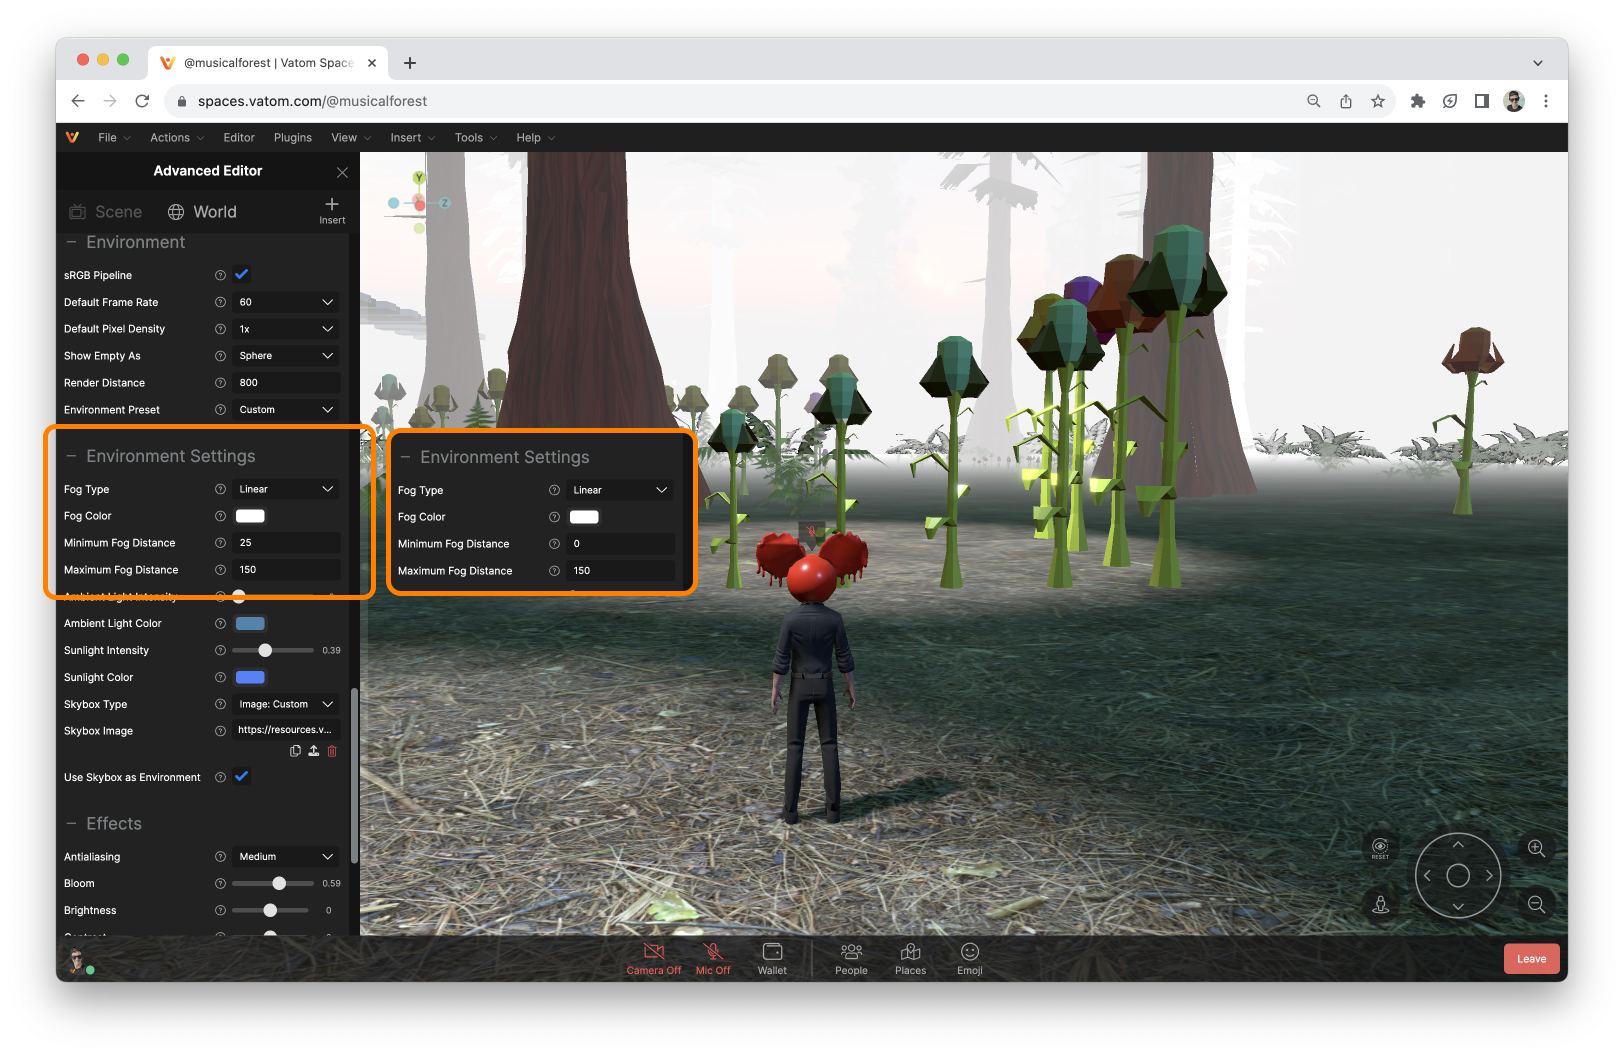
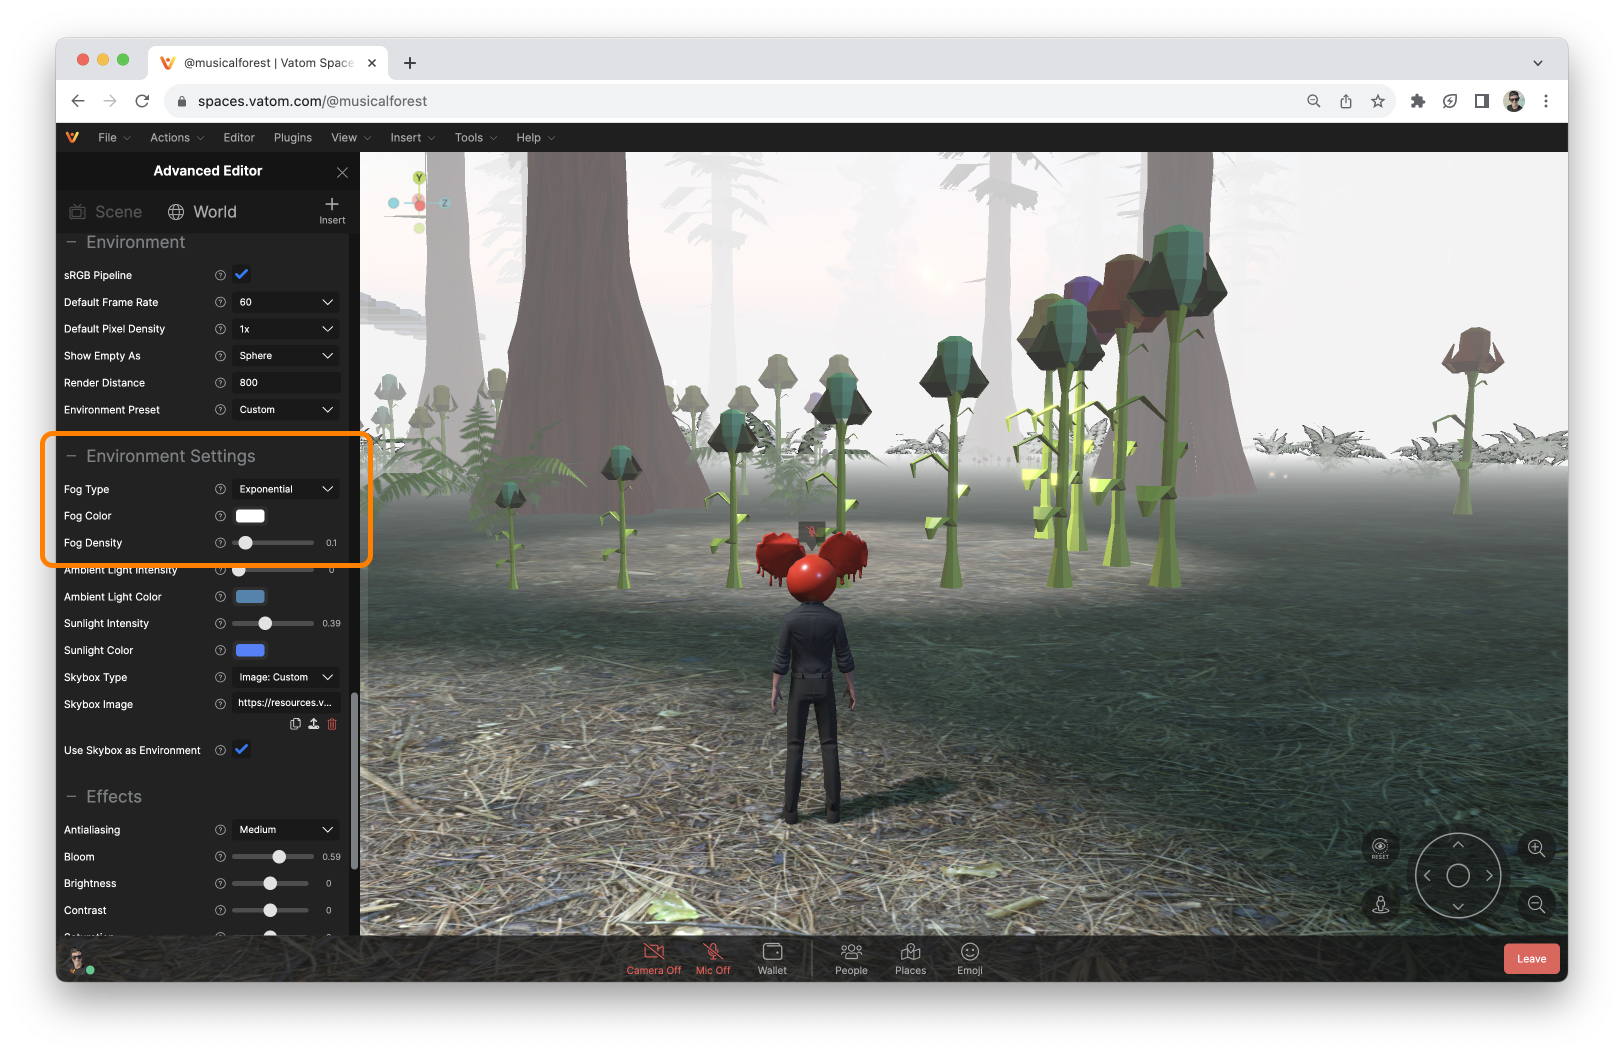
Fog washes out everything in your scene at a set distance. You can use fog in addition to Render Distance to pre-load objects in a new area out-of-view as a user moves towards it. Fog can be configured to None, Linear fog or Exponential fog, and a custom fog color can be selected.
Fog washes out objects outside of a specified distance, and is used to restrict the view of objects that are far away. Use Fog Distance in coordination with Render Distance to pre-load objects out-of-view of the guest.
Set Fog Distance lower than Render Distance in the World Editor > Environment Settings.
Choose the color of your fog layer, and choose between the two types of fog layering available, Linear and Exponential fog.
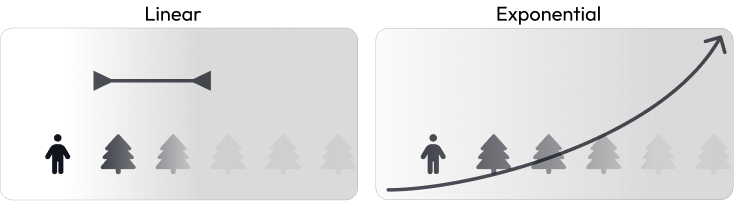
Linear Fog sets a Minimum and Maximum distance which fog transitions from 0% - 95% fog coverage. Setting the distance shorter makes fog seem thicker. Setting the distance further makes the fog appear more thin.
Exponential Fog starts right at the user and reaches the set Render Distance at full intensity. Adjust the Fog Density.
Ambient Light
Ambient Light affects the overall brightness of the scene and objects. Choose color and intensity from 0 to 1
Sunlight
Sunlight is a directional source that creates highlights and reflection. Choose a color and intensity from 0 to 1.
Skybox
Skybox is the visual background of your scene. It is a sphere that uses an equirectangular image 360 degree background. The skybox does not move and is always visible, with the option to reflect off of PBR textures.
You can choose a simple color, our default skybox image, or upload your own custom Skybox or Cubemap.
Use a 360º Panoramic HDRI Image (jpg or png). Our default Skybox is a blue-sky view from the clouds, overlooking a mountain range.
To find custom skybox images, you can search for the terms "HDRI", "Equirectangular", and "skybox".
Search on Shutterstock - AmbientCG Free Downloads
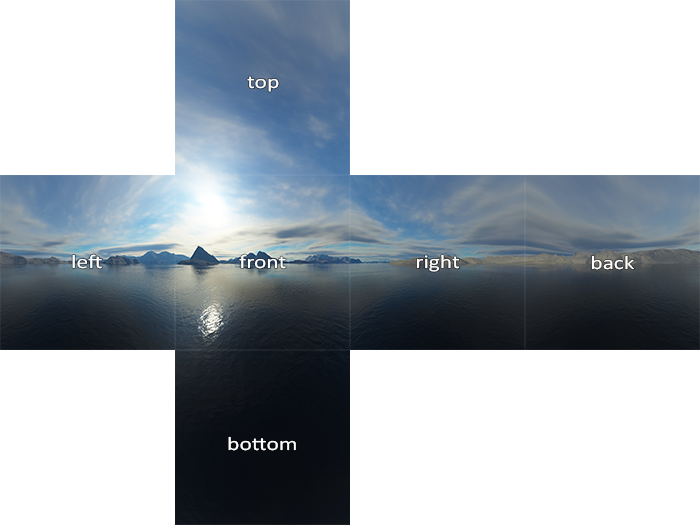
Cubemap
Instead of an equirectangular skybox image, you can also use Cubemaps. Cubemaps are a set of 6 images. Front, Back, Left, Right, Top, Bottom.
Environment Map
The Environment Map is the visual that is reflected by 3D objects in your world. Generally the environment map is the same as the skybox, but if you'd like you can have your objects reflect a different image than the skybox background you can disable "Use Skybox as Environment" and customize this image.
World Effects
The world effects are top-level visual effects, like a filter over your scene. Use sparingly.
Changing "Effects" in the World Settings will cause rendering problems with the 3D Web Frame Plugin. DO NOT Change World Effects settings if you are using 3D Web Frames in your space.
Bloom
Bloom creates a 'halo' effect around bright and light-emitting objects in your scene.
Brightness, Contrast, Saturation
These visual settings adjust the overall Brightness, Contrast, and Saturation of the displayed image. Use these to add a creative style to the way your space is presented. We recommend leaving these as set.
Chromatic Aberration
Adds a slight chromatic aberration or "Bad TV Effect" by separating the red and blue channels by 1 pixel.
Glitch
Creates an aggressive glitch effect every so often in the space. This effect can be very disturbing.
Noise
Displays a light 'digital noise' effect over your space.
Tone Mapping
Creates a "High Dynamic Range" look and feel.
Enable Outline
Displays the object outline when using tools and selecting objects. This outline is not visible to guests.
Enable SSO
Screen Space Ambient Occlusion adds shadow elements to corners, holes, and creases to create a more realistic shadows.
You can also include Ambient Occlusion in your glTF textures using a custom node.